

The Silent Threat Where Your Tub Meets the Wall
When homeowners across Peekskill ask about our methodology, we always emphasize a core principle—Beyond the Surface: Why We Regrout the Tub-to-Tile Seam During a Reglaze—because that tiny, dark fissure where the porcelain meets the wall is actually your bathroom's most vulnerable point. It often looks like a minor cosmetic flaw, such as a small chip in the grout or a thin hairline crack. Most homeowners brush this off, assuming it is just a normal sign of aging. However, that crumbling line is a critical risk to your home's structural integrity.
Overlooking small chunks of missing grout at this critical transition point is incredibly common. The gap may seem too narrow to cause real harm, but water is relentless. Every time you shower, runoff cascades directly over this horizontal joint. If the seal is compromised, moisture does not just evaporate; it wicks directly into the wall cavity. This creates a critical decision point during the preparation phase of any resurfacing project. We must decide whether to properly address and replace the damaged material, or risk trapping active water intrusion behind a brand new coating.
When you invest in professional bathtub reglazing, the goal is a beautiful, durable finish that lasts for years. But applying a high-performance glaze over a failing transition seam is like painting over a rotting piece of wood. It might look pristine for a few weeks, but the underlying decay will inevitably destroy the finish from the inside out. By treating the regrouting step as a mandatory structural protection measure rather than just a cosmetic upgrade, we ensure the foundation of your fixture is as solid as its new appearance.
The Anatomy of a Failing Tub-to-Tile Transition
To understand why this specific joint fails so frequently, you have to look at the physical forces at play in your bathroom. The transition line between your bathtub and the wall absorbs more physical stress than any other part of the enclosure. A standard cast-iron or steel tub, when filled with water and a person, can weigh hundreds of pounds. This immense weight causes the tub to flex and settle downward microscopically. The wall, however, remains completely stationary. This opposing movement places massive sheer force directly on the tub-to-tile transition seam.
In our years restoring fixtures at Bathtub Reglazing On The Hudson, our team typically sees these physical stresses magnified in Peekskill NY and surrounding Hudson Valley older homes. Peekskill's seasonal shifts—from intensely humid summers to freezing winter nights—cause significant thermal expansion and contraction. The building materials in your bathroom swell and shrink as the temperature and humidity fluctuate. When aging, inflexible grout is subjected to this constant movement, it inevitably cracks. Even microscopic, invisible hairline fractures are enough to allow moisture to bypass the waterproof barrier and seep into your bathtub tile surround.
Why Older Homes Face Higher Risks
Older properties carry unique vulnerabilities that make a watertight seam absolutely necessary. If you live in a historic or mid-century home, the risk factors multiply due to the natural aging of the structure.
• House settling: Decades of natural foundation settling put uneven, constant pressure on rigid grout lines, causing them to snap.
• Inflexible original materials: The grout used decades ago often lacks the polymer additives that give modern materials the flexibility needed to withstand daily usage.
• Outdated waterproofing: Historical building practices frequently lacked today's advanced waterproofing membranes, meaning water that breaches the seam goes straight into vulnerable wood and drywall.
The Hidden Dangers of Ignoring Compromised Grout
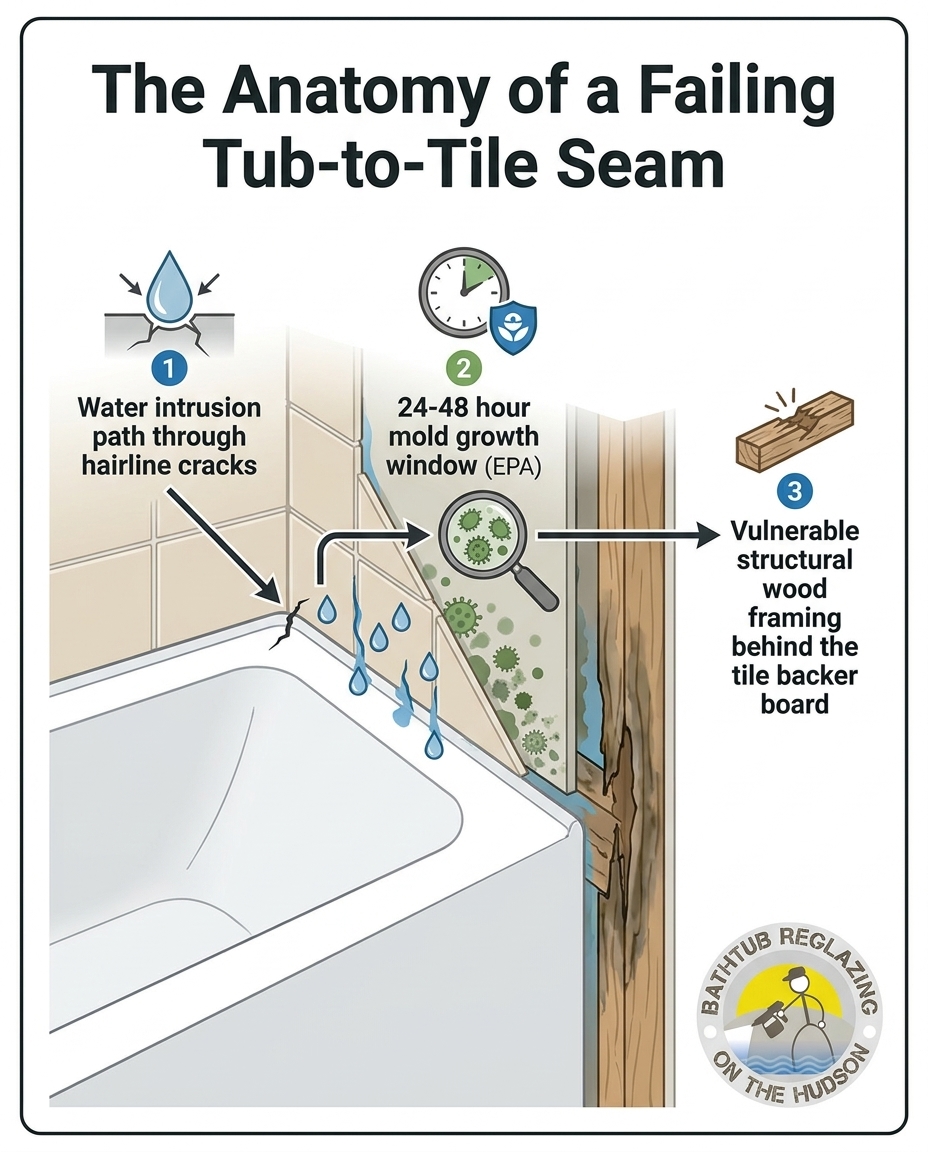
The most dangerous aspect of a failing tub-to-tile transition seam is that the worst damage happens completely out of sight. You might wipe down your bathroom surfaces diligently, but if water is slipping through a cracked joint, it is pooling in the dark cavity behind your walls. According to Environmental Protection Agency (EPA) guidelines, mold can begin growing within just 24 to 48 hours of moisture intrusion on organic materials like drywall paper and wood framing.
Because gravity pulls shower runoff downward, a compromised horizontal seam acts exactly like a funnel. It directs gallons of water over time straight into the wall cavity. This hidden water intrusion is a leading cause of preventable structural wood rot in residential framing. The damage is entirely silent. Most homeowners have no idea there is a problem until the tiles become physically loose, the wall feels soft to the touch, or a dark stain appears on the ceiling of the room below.
Addressing the grout line before applying a new finish is a critical step to prevent mold and mildew in bathroom tiles and the structures behind them. If you seal over a wet cavity, you are effectively creating a greenhouse inside your wall. The moisture has nowhere to evaporate, which rapidly accelerates the rotting process and feeds aggressive mold colonies.
• Dark, discolored patches in the grout — Hidden Consequence Behind the Wall: Active mold colonies feeding on the backer board
• Hairline cracks along the transition — Hidden Consequence Behind the Wall: Slow, constant moisture wicking into wood studs
• Missing chunks of material — Hidden Consequence Behind the Wall: Direct funneling of shower runoff into the wall cavity
• Spongy or flexible caulking — Hidden Consequence Behind the Wall: Trapped water preventing the materials from ever drying
Why Superficial Fixes Fail: The "Spray Over" Shortcut
In our experience evaluating failed jobs across the region, the refinishing industry is unfortunately full of cut-rate contractors who prioritize speed over longevity. One of the most common shortcuts our technicians see is the "spray over" technique. Instead of taking the time to extract failing caulk or crumbling grout at the tub-to-tile transition seam, these operators simply spray their industrial coating directly over the old, compromised materials. This saves them an hour of labor, but it passes a massive future liability directly to the homeowner.
Applying a rigid, high-performance glaze over a soft, unstable, or moisture-laden base guarantees failure. The new coating cannot properly crosslink and bond to wet grout or flexible silicone. Within months—sometimes weeks—the new finish along that joint will begin to bubble, peel, and flake away. This not only ruins the aesthetic of your newly resurfaced tub, but it re-opens the water intrusion path.
More importantly, spraying over a compromised joint traps existing moisture inside the wall cavity. If the old grout was already letting water through, sealing it over locks that dampness into the wood framing, accelerating rot. A shiny, bright white tub is ultimately useless if the wall supporting it is actively deteriorating. We mandate the regrouting step as a non-negotiable standard in our process, demonstrating a firm commitment to your home's structural integrity over fast-turnaround cosmetic illusions.
Our Standard Process: Meticulous Grout Removal and Replacement
Because we understand the severe consequences of trapped moisture, our methodology requires a complete reset of the transition joint. A pattern our Bathtub Reglazing On The Hudson team sees often involves homeowners reaching out after a large piece of their bathtub glaze has chipped off, revealing underlying issues with the old joint. In one recent project, our technician arrived to find a severely compromised seam. We meticulously cleaned up the old, failing grout, extracted the debris, and replaced it entirely before moving forward. The result was a tub that not only looked fantastic but functioned much better than before, securely repelling water.
To achieve this level of reliability, we follow a strict, professional protocol for every project. This vital prep work must be entirely completed and properly cured before any actual reglazing finish is applied to the bathtub.
1. Thorough Extraction: We carefully remove all old, chipped, and failing material along the transition seam, digging down to the solid substrate rather than just skimming the surface.
2. Deep Cleaning and Sterilization: The exposed channel is aggressively cleaned to remove soap scum, hidden mildew, and mineral deposits that could interfere with bonding.
3. Moisture Evacuation: We ensure the channel is bone-dry. Applying new material over dampness is a recipe for failure, so we verify all residual moisture is eliminated.
4. Application of Fresh Material: We apply fresh, high-quality, flexible material designed specifically for high-moisture, high-movement joints, creating a permanent watertight seal.
This process is especially critical in early fall, as homeowners begin preparing their bathrooms for increased indoor winter use and the arrival of holiday guests. A heavy-use season demands a joint that can handle the increased water volume without failing.
Long-Term Protection for Your Bathroom's Infrastructure
The ultimate benefit of this meticulous preparation is guaranteed longevity. When you ensure the tub-to-tile transition seam is completely watertight, you extend the lifespan of the entire bathroom setup. The peace of mind that comes from knowing your home's structural framing is protected from hidden rot is invaluable. You can take long, hot showers without wondering if water is slowly destroying the wood behind your walls.
Beyond structural protection, doing the job right yields a vastly superior visual result. A clean, newly grouted transition line provides a sharp, crisp border that beautifully frames the final reglazing work. We frequently encounter bathtubs that need resurfacing because they are in remarkably rough shape. By providing meticulous prep work—including establishing sharp edges at the seam—we consistently deliver a mirror-smooth finish with a flawless sheen that makes the fixture look brand new.
In older homes across Peekskill NY and the surrounding Hudson Valley, getting this step right the first time prevents incredibly costly tear-outs down the road. Whether you are addressing the tub alone or combining it with a full bathroom tile reglaze, the integrity of that single connecting line dictates the success of the entire project.
Frequently Asked Questions About Tub-to-Tile Transitions
Why do you need to replace grout before reglazing a tub?
Replacing the grout ensures that the new glaze has a solid, stable, and completely dry foundation to bond with. If you apply a hard coating over crumbling or wet material, the finish will quickly bubble and peel. Furthermore, replacing the material guarantees that the joint is watertight, preventing shower runoff from seeping behind the walls and causing hidden structural damage.
What happens if water gets behind the tub seam?
When water breaches the tub-to-tile transition seam, it wicks into the wall cavity and saturates the backer board and wooden framing. Because this area is dark and lacks airflow, the moisture cannot evaporate, leading to rapid mold growth within 24 to 48 hours. Over time, this constant dampness causes severe wood rot, which can compromise the structural integrity of your floor and walls.
Can you reglaze over chipped grout?
While some cut-rate refinishers will spray directly over chipped grout to save time, doing so guarantees premature failure of the new finish. The glaze cannot bridge gaps or bond to unstable, crumbling debris. The proper method mandates completely removing the damaged material, cleaning the joint, and applying fresh grout or specialized sealant before any reglazing occurs.
Should you grout or caulk where the tub meets the tile?
Because a bathtub flexes and settles slightly under the heavy weight of water and a bather, the transition joint requires a material that can handle microscopic movement. Standard cement-based grout is rigid and will crack under this stress. Professionals typically use a high-quality, flexible, mold-resistant sealant or specialized flexible polymer grout for this specific horizontal seam to ensure it remains watertight.
How quickly can mold grow behind compromised bathroom tiles?
According to the EPA, mold spores can begin to grow and multiply within 24 to 48 hours of a moisture intrusion event. If your transition seam is cracked, every shower introduces fresh water to the dark wall cavity, creating a continuous feeding ground for mold. This is why addressing a failing joint promptly is critical for maintaining healthy indoor air quality.
Secure Your Bathroom Before the Heavy Use Season
A failing seam is not an issue that resolves itself; it only grows worse with every shower. As we head into early fall, now is the ideal time to evaluate your bathroom's condition. Preparing your home for increased indoor winter use and holiday guests means ensuring your plumbing fixtures are completely watertight and structurally sound.
Do not wait until a loose tile or a soft wall forces you into a massive renovation project. By addressing vulnerabilities proactively and choosing professional options that prioritize structural health over superficial shortcuts, you protect your home's framing for the long haul. If your bathtub is showing its age and the grout lines are crumbling, reach out to a professional who mandates doing the job right from the inside out.
Schedule Service
Thank you! Your submission has been received!
Oops! Something went wrong while submitting the form.
Other Blogs
Customer Testimonials
Hear what customers are saying about our professional refinishing and outstanding results.

Can’t say enough about Maurice. From start to finish great communication his work is incredible and he stands by it very competitive pricing just all-around good guy the work was done quick and kept very clean and our brand new bathroom
Joey N.
We had a large piece of bathtub glaze chip off. Maurice came in and did a fantastic job. It now looks and works better than before. He went above and beyond the contract by cleaning up the old chipped grout between the tub and the tiles and replacing with brand new.
Bozidar J.
Maurice did a great job on my tub. It looks brand new.
Steven S.