




Are Your Tub Edge Tiles Suddenly Coming Loose?
Have you found yourself asking, "why are my bathroom tiles popping off around the tub edge?" after a routine shower cleaning? Finding a loose, shifting, or completely detached tile resting on the ledge of your bathtub is a frustrating discovery. It immediately disrupts the clean look of your bathroom and introduces a critical decision point for any homeowner: do you simply find a strong adhesive to glue the tile back into place as a quick fix, or do you investigate the underlying integrity of the wall?
The short answer is that a tile falling off the wall is rarely a simple adhesive failure. When tiles begin to detach at the seam where the wall meets the bathtub, it is almost always a glaring symptom of hidden moisture issues operating behind the scenes. This is especially true in Peekskill and Hudson Valley older homes, where original bathroom construction techniques may not meet modern waterproofing standards. What looks like a single loose square of ceramic is usually the final stage of a much deeper structural problem.
Setting up a long-term solution requires a professional perspective. Proper bathroom tile reglazing and restoration work demands a solid, completely undamaged foundation. If the wallboard behind your tile has lost its structural integrity, simply sticking the tile back on will only mask the problem temporarily while the water damage continues to spread out of sight.
The Hidden Mechanics of Tile Failure at the Tub Seam
To understand why your tiles are suddenly failing, you have to look at the daily environmental stress your bathtub surround endures. The seam where the bottom row of wall tiles meets the bathtub ledge is the most vulnerable point in your entire bathroom. Every time you shower, gallons of water cascade down the walls and pool exactly at this junction.
Over time, the constant exposure to water, combined with the natural settling of your home, causes micro-cracks to form in the caulk and grout lines. Most homeowners do not realize that grout itself is not inherently waterproof. In fact, the Tile Council of North America (TCNA) emphasizes that standard cement-based grout is porous and requires a proper moisture barrier behind the tile installation to prevent water from reaching the wall cavity.
The timing of when these tiles actually fall off is often tied to seasonal changes. As we move into October / pre-winter heating season, indoor relative humidity drops significantly as furnaces and boilers kick on. This rapid shift in the indoor climate causes wooden wall studs and framing materials to contract. If the tiles attached to that framing are already weakened by moisture intrusion, this seasonal contraction is often the final trigger that forces them to pop off the wall entirely. Because of this, structural repairs before resurfacing are absolutely non-negotiable for a lasting, permanent fix.
How Water Bypasses the Grout Line
Water intrusion is rarely a sudden flood; it is usually a slow, insidious process that takes months or years to compromise your wall. The mechanics of this failure typically follow a specific pattern:
• Continuous exposure to standing water: The horizontal ledge of the tub naturally catches and holds water, keeping the bottom grout line saturated longer than the rest of the wall.
• Deterioration of silicone caulking: Caulk shrinks, dries out, and peels over time, breaking the critical flexible seal between the rigid tile wall and the bathtub itself.
• Capillary action: Once a micro-crack forms, water doesn't just sit there. Capillary action actually pulls the moisture upward and inward, drawing it behind the tile surface and directly into the wallboard.
• Silicone Caulk — Healthy State: Flexible, continuous seal, repels water completely. — Failing State (Leading to Tile Pop): Shrunken, peeling, discolored, allowing water behind the tub lip.
• Tile Grout — Healthy State: Solid, crack-free, properly sealed against moisture. — Failing State (Leading to Tile Pop): Porous, developing hairline cracks, crumbling to the touch.
• Wall Substrate — Healthy State: Rigid, dry, firmly holding the thinset adhesive. — Failing State (Leading to Tile Pop): Damp, swollen, soft, actively releasing the adhesive bond.
The Chain Reaction: From Cracked Grout to Crumbling Substrate
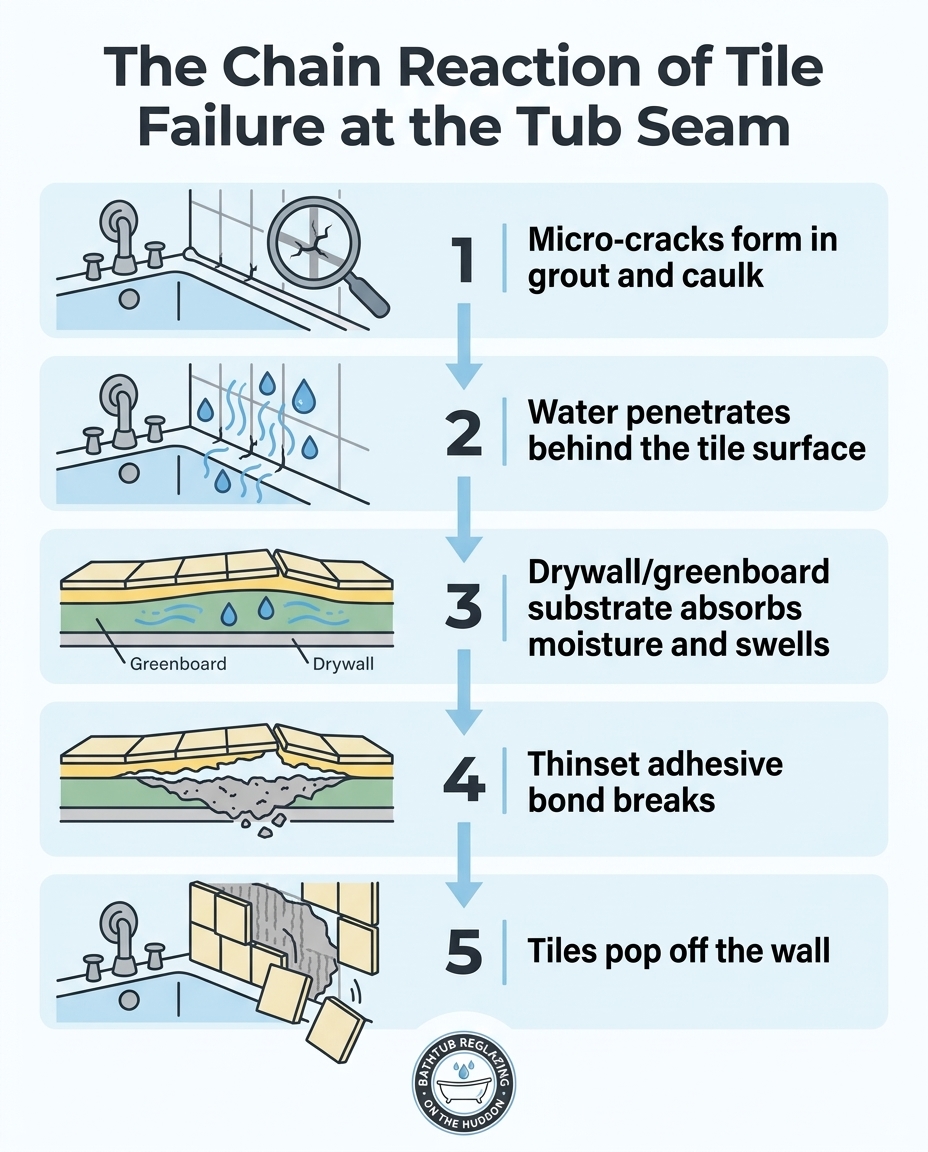
Once water successfully bypasses the grout and caulk lines, a destructive chain reaction begins inside your wall cavity. The severity of this reaction depends heavily on the materials used to build your shower surround. In many Peekskill and Hudson Valley older homes, bathtub surrounds were constructed using standard drywall or water-resistant greenboard, rather than the highly durable cement board or modern waterproofing membrane systems used by today's top-tier contractors.
When standard drywall or greenboard is exposed to persistent moisture, it acts like a rigid sponge. The gypsum core absorbs the water, causing the entire panel to swell outward. As the material swells, it loses its structural density and begins to crumble into a soft, chalky paste. This is the exact moment the tile failure becomes inevitable.
The thinset or mastic adhesive holding your tile to the wall relies entirely on the strength of the substrate beneath it. When the wallboard crumbles, the adhesive bond is completely severed. The tile is no longer attached to a solid wall; it is merely floating on a layer of wet, disintegrating gypsum. Furthermore, this enclosed, damp wall cavity creates the perfect breeding ground for persistent mold and mildew, which will continue to grow and spread long after the surface of the shower has dried.
Why Gluing Loose Tiles Back On Is a Guaranteed Failure
When faced with a gaping hole in the shower wall and a loose tile in hand, the immediate temptation for many homeowners is to reach for a tube of construction adhesive, waterproof silicone, or superglue. The logic seems sound: if the tile fell off, simply sticking it back on should solve the problem. However, this superficial fix is a guaranteed failure that will inevitably lead to more extensive and costly damage.
First, gluing a tile over rotted, water-logged drywall traps existing moisture inside the wall cavity. By sealing the surface, you eliminate any chance for the underlying materials to dry out. The trapped moisture will continue to degrade the surrounding wallboard, spreading the rot to adjacent tiles that were previously secure. This trapped dampness also accelerates the growth of hidden black mold within the wall studs.
Second, a compromised substrate simply cannot support the weight or movement of the tile. Construction adhesive requires two solid surfaces to form a lasting bond. If you apply heavy-duty glue to a crumbling piece of drywall, the glue will stick to the chalky surface, but the drywall itself will just tear away from the wall under the weight of the tile. The tile will fall off again, usually taking a larger chunk of the wall with it.
True bathroom restorations require addressing the root cause, not just covering up the symptom. If the foundation is rotting, no amount of surface-level glue will stabilize the structure. The damaged wallboard must be completely removed and replaced with appropriate, waterproof materials before any cosmetic fixes are applied.
The Connection Between Wall Integrity and Professional Reglazing
If your bathtub surround is looking tired, outdated, or suffering from loose tiles, you might be considering a complete professional reglazing. However, a professional tile surround reglaze is only as strong as the wall behind it. Applying a beautiful, high-gloss finish over a structurally compromised wall is a waste of time and resources. The movement of the loose tiles will quickly crack the new glaze, ruining the seamless finish.
This is where strict professional standards make all the difference. Bathtub Reglazing On The Hudson maintains a rigid commitment to addressing underlying water damage and structural integrity before applying any glaze, ensuring a permanent and safe fix. Proper remediation of the damaged area prevents future bubbling, shifting, or chipping of the new surface.
One homeowner reached out this past winter when their bathtub was worn out and needed professional restoration and fresh caulking. They requested a same-day appointment to address the deteriorating conditions. The technician laid down protective canvas, performed a clean, comprehensive resurfacing that addressed all surface flaws, and applied fresh, watertight caulking. The bathtub looked brand new, the structural integrity of the seals was restored, and the workspace was left completely spotless.
Proper Preparation Before the Glaze
Comprehensive bathroom refinishing in Westchester County involves meticulous preparation to ensure the final product lasts for years. This preparation phase includes:
• Complete removal of failed materials: All old, peeling caulking and chipped, porous grout must be entirely scraped away and removed from the seams.
• Drying and treating the wall: Any exposed wall areas must be thoroughly dried, and the underlying cavity assessed for severe rot or mold that requires remediation.
• Rebuilding the structural foundation: If the wallboard is compromised, the damaged sections must be cut out and rebuilt with proper waterproof backing to support a flawless, unmoving finish.
Signs Your Tub Surround Needs Structural Intervention
How do you know if your loose tile is a minor fluke or a sign of severe structural failure? While a professional assessment is always the safest route, there are several clear indicators that water has bypassed your grout and compromised the wall cavity. If you notice any of the following symptoms alongside your popping tiles, it is time to look beyond a simple cosmetic patch.
• Spongy or yielding walls: Press gently on the tiles immediately above the bathtub seam. If the wall flexes, feels soft, or moves inward under light pressure, the substrate behind it has completely rotted away.
• Persistent mildew or black mold: If you scrub your grout lines clean with bleach, but dark mold spots return within a matter of days, the moisture is coming from behind the wall, pushing mold spores outward through the porous grout.
• Continuously cracking grout: If you have recently repaired or patched the grout around your tub, and it cracks and falls out shortly after, the wall behind the tile is shifting and flexing, breaking the rigid grout seal.
• A visible gap or bowing: Look down the length of the tub ledge. If the bottom row of tiles appears to be bowing outward or creating a widening gap between the tile and the tub lip, the swollen wallboard is actively pushing the tiles off the wall.
If your bathroom is exhibiting these symptoms, ignoring the problem will only lead to more expensive structural repairs down the line. It is highly recommended to seek professional bathtub tile surround repair to properly diagnose the extent of the water damage and rebuild the foundation correctly.
FAQ
Can I just glue a loose shower tile back on?
No, gluing a loose shower tile back on is a temporary fix that traps existing moisture inside your wall. When a tile falls off, it usually means the drywall or substrate behind it has crumbled due to water damage. Applying glue to a rotting surface ensures the tile will eventually fall off again, often causing more damage to the surrounding area.
What happens if water gets behind shower tiles?
When water gets behind shower tiles, it soaks into the wallboard, causing standard drywall or greenboard to swell, soften, and disintegrate. This moisture breaks down the thinset adhesive holding the tiles in place, leading to loose or falling tiles. Furthermore, the trapped dampness creates an ideal environment for hidden mold and mildew to spread throughout the wall cavity.
Why is the grout cracking around my tub?
Grout cracks around the tub primarily because of structural movement or underlying moisture damage causing the wall to swell and shift. As the house settles or as water compromises the wallboard behind the tiles, the rigid grout cannot flex with the movement and snaps. Seasonal humidity changes can also cause the wooden framing behind the tub to contract, further stressing the grout lines.
How do you know if there is water damage behind shower tile?
You can identify water damage behind shower tiles by pressing gently on the wall; if it feels spongy or yields to pressure, the substrate is compromised. Other common signs include persistent mold that returns immediately after cleaning, grout that continuously cracks and falls out, and tiles that physically bow outward or pop off the wall entirely.
Will reglazing my tub surround fix a loose tile problem?
Reglazing your tub surround will not fix a loose tile problem if the underlying wall structure is damaged. A professional reglaze requires a solid, unmoving foundation to prevent the new finish from cracking. The water-damaged wallboard must be completely repaired and the tiles properly secured before any reglazing work can successfully take place.
Addressing the Root Cause for a Lasting Finish
Finding a loose tile on your tub ledge is a clear warning sign that water has breached your shower's defenses. By understanding why the tiles are falling and recognizing that gluing them back is a guaranteed failure, you can avoid trapping moisture and causing further rot. The proper professional process involves fixing the compromised wall integrity first, ensuring that when you do invest in a full tub and tile reglaze, the beautiful new finish has a solid, lasting foundation.
Schedule Service
Thank you! Your submission has been received!
Oops! Something went wrong while submitting the form.
Other Blogs
Customer Testimonials
Hear what customers are saying about our professional refinishing and outstanding results.

Can’t say enough about Maurice. From start to finish great communication his work is incredible and he stands by it very competitive pricing just all-around good guy the work was done quick and kept very clean and our brand new bathroom
Joey N.
We had a large piece of bathtub glaze chip off. Maurice came in and did a fantastic job. It now looks and works better than before. He went above and beyond the contract by cleaning up the old chipped grout between the tub and the tiles and replacing with brand new.
Bozidar J.
Maurice did a great job on my tub. It looks brand new.
Steven S.


