
The Hidden Fear Behind Bathroom Updates: Overspray and Collateral Damage
You have finally updated your cabinetry, the new tile floor looks pristine, and the only eyesore left in the room is that dull, chipped bathtub. But you are hesitating. The thought of permanent overspray ruining your brand-new fixtures is holding you back. You want to know exactly how we mask and protect your bathroom vanity and toilet during a spray glaze before you allow any equipment into your home. Here at Bathtub Reglazing On The Hudson, we hear this hesitation weekly. Homeowners fear that spray glazing a bathtub will result in permanent damage to their expensive bathroom vanities, toilets, walls, and floors, turning a simple update into a costly disaster.
Here is the truth about those horror stories: overspray is not an inevitable part of the refinishing process. When you see fine white mist settled on a toilet tank or a sticky residue left on a custom wood cabinet, you are looking at a symptom of substandard preparation. A flawless finish requires treating the bathroom like a sealed environment before any equipment is ever turned on. When you invest in professional reglazing, the actual application of the coating is only a fraction of the work. For our team, the real craftsmanship lies in the meticulous site isolation.
Understanding these protective protocols is the key to a stress-free bathroom update. You should never have to cross your fingers and hope your surrounding fixtures survive the process. By pulling back the curtain on the exact masking, 3-mil draping, and ventilation techniques utilized by our professionals, you can move forward with your renovation knowing that your investment is completely protected from start to finish.
The 'Cleanroom' Philosophy: Why Preparation is 80% of the Job
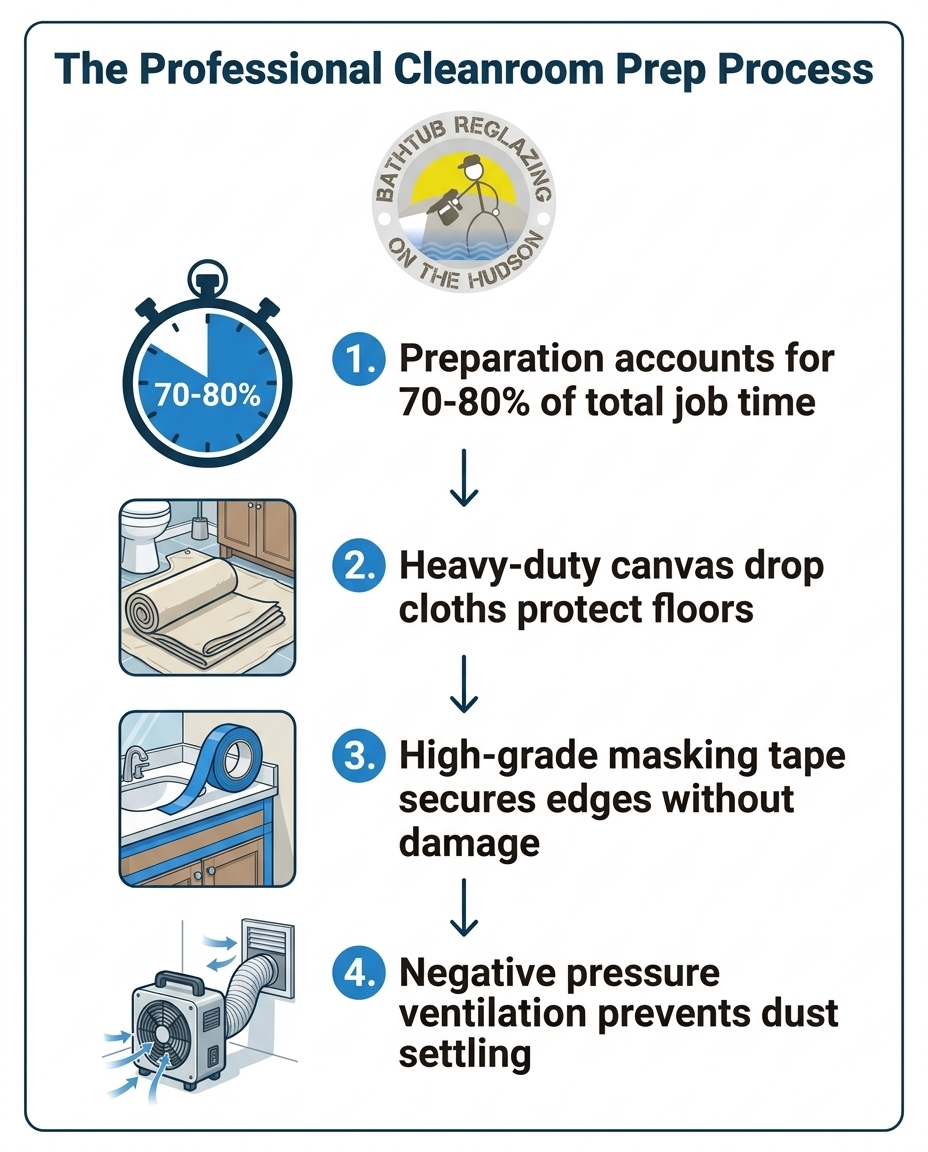
Overspray isn't just an inconvenience; it is a fundamental failure of preparation. Treating the rest of the bathroom like a cleanroom before the spray equipment even turns on is the only way to guarantee a flawless finish without collateral damage. In our years serving the Hudson Valley, proper surface preparation, masking, and site isolation account for up to 70 to 80 percent of the total time spent on a high-quality refinishing job. If a technician rushes through this phase, the final result will inevitably suffer.
The process begins long before any coatings are mixed. First, we remove the existing caulking around the tub, take off the hardware like the overflow plate and drain cover, and establish a completely clean perimeter. This is where our professional "cleanroom" approach starkly contrasts with the messy realities of improper DIY attempts or rushed contractor work. We are not just throwing a few thin sheets on the floor; we are engineering a highly controlled environment. Every square inch of the room that is not being glazed must be accounted for and shielded.
The goal is twofold: protect the room from the bathtub spray glaze, and protect the wet glaze from the room. A bathroom is naturally full of microscopic dust, lint from towels, and airborne particles that can easily settle onto a freshly coated surface, ruining its smooth, glass-like sheen. By meticulously sealing the space, we create the absolute perfect environment for the new finish to cure.
Setting the Stage for Success
Before any masking tape is applied to your fixtures, we secure the broader environment. This foundational step ensures that our movement in and out of the space does not track debris or cause accidental damage.
• Heavy-duty canvas drop cloths: We lay 10-ounce, professional-grade canvas over your bathroom floors and hallways. Unlike thin 1-mil plastic, canvas stays securely in place, provides a safe walking surface, and absorbs any accidental drips before they can reach your flooring.
• Secure walking paths: We create a dedicated, protected pathway from your front door directly to the bathroom, ensuring the rest of your home remains completely undisturbed.
• Dust trap inspections: We inspect the room for hidden dust traps—such as the bathroom exhaust fan grate, the tops of door frames, and window sills—cleaning them or sealing them off before the masking process begins.
Shielding Your Vanity: Protecting Cabinetry and Sinks from Spray
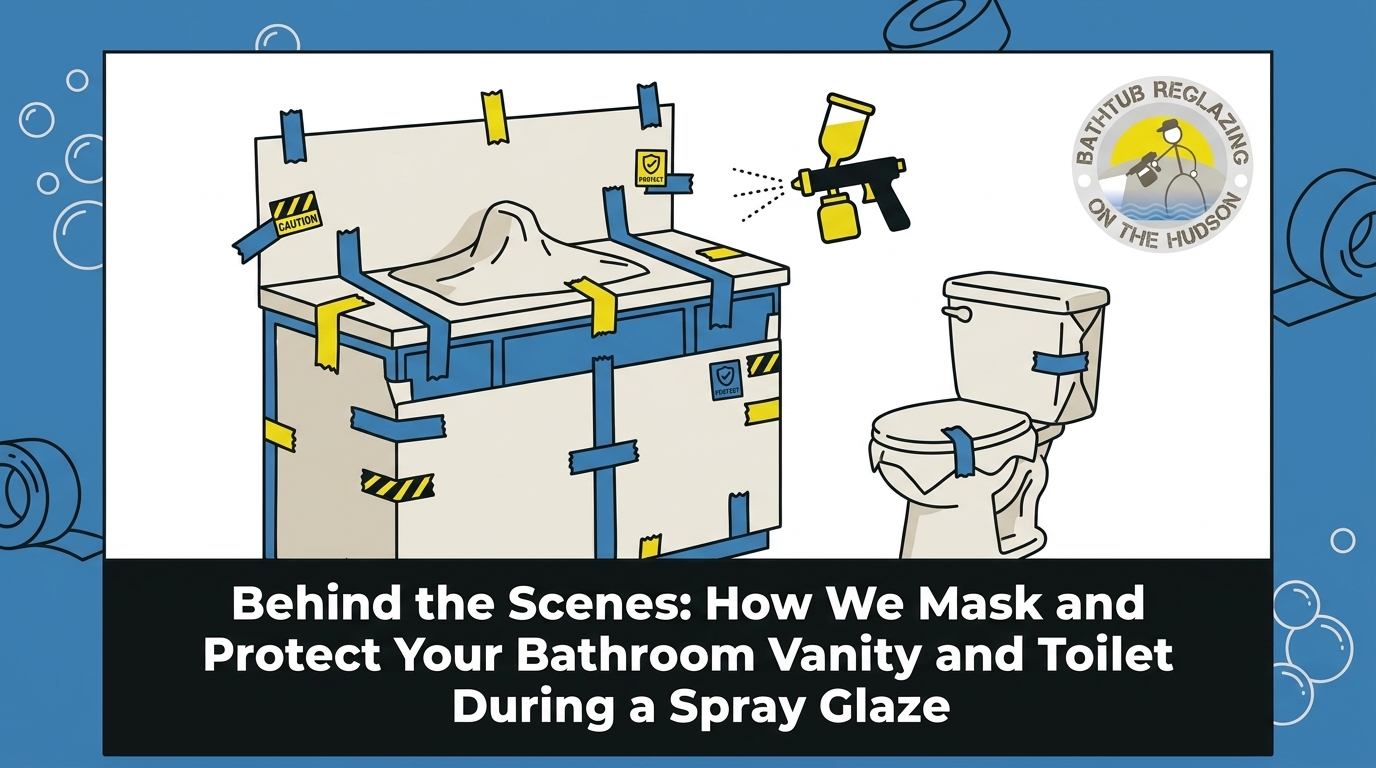
One of the most vulnerable elements in any bathroom update is the vanity. In many modern layouts, standard close-coupled toilets and adjacent 30-inch to 36-inch freestanding vanities sit mere inches away from the bathtub apron. If you have just invested in beautiful new cabinetry, the idea of airborne particles settling onto the wood grain or the fresh countertop is incredibly stressful. That is why isolating the vanity requires a precise, step-by-step methodology.
Our technicians do not simply drape a thin sheet of plastic over the sink and hope for the best. The isolation process is highly systematic, ensuring an impenetrable barrier that completely shields your investment while we work. If you are also considering sink and vanity reglazing as part of your project, the prep process is adjusted accordingly, but for a standalone tub job, the vanity is completely locked down.
1. Edge isolation with specialized tape: We begin by applying high-grade, low-tack masking tape (rated for 14-day clean removal) along the very edge of the vanity where it meets the tub or the wall. This specific tape is engineered to create a razor-sharp seal without pulling paint, damaging delicate wood finishes, or leaving behind sticky adhesive residue.
2. Applying the heavy-duty barrier: Once the perimeter is established, we secure heavy-duty 3-mil plastic draping over the entire vanity structure. This plastic is thick enough to resist tearing if brushed against and dense enough to stop any micro-droplets of glaze in their tracks.
3. Sealing the seams: We then tape down all the seams of the plastic draping, securing it to the floor drop cloths and the wall masking. This prevents any drafts from lifting the plastic and exposing the cabinetry underneath.
4. Protecting the sink basin and fixtures: The sink basin, faucet, and handles are fully encapsulated within this plastic barrier. We ensure no airborne particles can find their way into the drain or settle onto the polished metal finishes.
By following these steps, we reassure homeowners that even the most delicate, newly installed cabinetry remains completely shielded. When the plastic comes down, your vanity looks exactly as it did before we arrived.
Navigating Tight Layouts: Isolating Close-Coupled Toilets
Working in older properties presents a unique set of challenges. Peekskill and Hudson Valley historic homes built between 1920 and 1950 frequently feature extremely tight bathroom layouts where the bathtub, vanity, and toilet share virtually the same footprint. In many of these classic floor plans, a standard close-coupled toilet is positioned so close to the tub that there is often less than a 1/4-inch of clearance between the porcelain and the tub apron. Navigating these tight clearances requires specialized techniques.
Some contractors might insist that the toilet must be completely unbolted and removed from the bathroom before the tub can be serviced. While removal is sometimes necessary for major structural repairs, it is often a risky and costly endeavor just for a surface update. Removing an old toilet can crack fragile porcelain, break aging wax rings, or disturb decades-old plumbing connections, leading to unexpected leaks and plumbing bills. Instead, the team at Bathtub Reglazing On The Hudson utilizes a technique called "micro-masking."
Micro-masking allows us to fully isolate the toilet without disrupting the plumbing. We carefully slide protective barriers behind the tight toilet tank, wrap the bowl, and seal the base where it meets the floor. This exact approach was used recently for a Peekskill homeowner who reached out with a heavily mineral-stained porcelain tub wedged tightly next to their toilet in a 1930s craftsman home. By meticulously masking the adjacent fixtures, we turned the tub spotless and shiny white, fully protecting the surrounding areas, and exceeding expectations—all without ever touching a wrench to the plumbing.
Working Around Existing Plumbing
Successfully isolating a toilet in a cramped space requires patience and the right materials. If your bathroom also features older tile that you are protecting (or perhaps you are planning bathroom tile reglazing later), the masking must be flawless.
• Sliding barriers behind the tank: We use specialized masking tools to slide thin but durable plastic sheeting behind the toilet tank, ensuring the wall and the back of the porcelain are fully covered.
• Residue-free adhesion: We use premium tapes that adhere securely to the cold porcelain of the toilet bowl and tank but peel away cleanly, ensuring no sticky residue is left behind to collect dust later.
• Wind-proofing the wrap: Because we use powerful exhaust fans to manage fumes, the bathroom experiences significant airflow. We secure the plastic draping tightly around the toilet so it does not flap, tear, or pull away from the tape lines during the glazing process.
Controlling the Air: Ventilation and Dust Prevention Protocols
Masking isn't just about stopping wet glaze from getting out; it is equally about stopping dust from getting in. This is where the "cleanroom" philosophy truly comes into play. You can have the most beautifully taped vanity in the world, but if the airflow in the room isn't managed correctly, the final finish on the bathtub will be compromised by airborne debris.
This is especially critical now as we head into September 2026. During this early fall transition, windows are often closed to block out the 50-degree morning chill, making proper masking and self-contained ventilation protocols absolutely crucial. In our region, fluctuating seasonal humidity and chilly autumn drafts in Peekskill require a tightly controlled environment. If a window is simply left open, a sudden breeze can blow microscopic dust directly onto the curing surface, creating rough spots and imperfections.
To combat this, our technicians set up self-contained exhaust ventilation systems that create negative pressure in the bathroom. This means up to 500 CFM (cubic feet per minute) of air is continuously being pulled out of the room and safely exhausted outdoors, rather than drifting into your hallways. Negative pressure ensures that fumes never migrate into your living spaces and that dust is actively pulled away from the wet tub.
• Airborne Dust Settling — The Cause: Seasonal drafts and standard HVAC airflow moving particles around the room. — Our Cleanroom Solution: Sealing HVAC vents in the bathroom and establishing negative pressure to pull dust away.
• Lingering Fumes — The Cause: Closed windows during early fall transitions trapping odors indoors. — Our Cleanroom Solution: High-powered, 500-CFM exhaust systems venting directly outside.
• Overspray Drift — The Cause: Unmanaged air currents carrying microscopic glaze droplets to unmasked areas. — Our Cleanroom Solution: Comprehensive 3-mil plastic draping combined with directional airflow control.
By mastering the airflow in the room, we ensure that the heavy-duty masking materials do their job perfectly, resulting in a mirror-smooth finish that looks like it came straight from the factory.
The Reveal: Our Clean-Up Process and Zero-Overspray Guarantee
The true mark of a professional isn't just how the bathtub looks when it's wet; it is how the entire bathroom looks when the job is completely finished. The unmasking and clean-up process is just as systematic as the preparation. Once the new glaze has stabilized and reached the appropriate tackiness, we begin the careful removal of all masking tape, plastic draping, and canvas drop cloths.
This is a delicate process. Tape must be pulled at the correct angle to ensure a razor-sharp edge where the tub meets the tile or the wall. We carefully fold the plastic draping inward as we remove it, ensuring that any dust that settled on the outside of the barrier is trapped and thrown away, rather than shaken loose into the room. We conduct a rigorous final inspection to ensure the vanity, toilet, walls, and floors are exactly as they were found.
This meticulous clean-up process is the core reason our customers consistently praise the final result. For example, one local customer recently reached out because their tub was in incredibly rough shape. After our team completed the work, the tub looked good as new—but just as importantly, the workspace was left immaculate, with zero imperfections on the surrounding fixtures. At Bathtub Reglazing On The Hudson, we stand behind a zero-overspray guarantee because we know our prep protocols are bulletproof.
When comparing bathtub reglazing vs. replacement, homeowners often worry about the mess of construction. Our cleanroom approach proves that you can achieve a stunning, factory-new look without the demolition dust or the fear of collateral damage.
Experience a Flawless Finish with Total Peace of Mind
A beautiful, long-lasting bathroom update relies entirely on the care taken before the actual work begins. The difference between a stressful renovation and a seamless upgrade comes down to the protective measures implemented on-site. By treating your bathroom like a cleanroom, controlling the airflow with high-capacity exhaust, and utilizing high-grade masking techniques, we ensure that your expensive vanity, toilet, and floors remain perfectly safe.
You should never have to compromise the safety of your existing fixtures to get a beautiful new bathtub. When you are exploring your bathroom improvement options, always prioritize a company that takes prep work seriously. We provide a transparent, step-by-step breakdown of our protective masking measures because we want you to have total peace of mind. Your home deserves nothing less than a flawless finish, delivered with the utmost respect for your space.
Frequently Asked Questions
Does bathtub refinishing make a mess?
The short answer is no, not when performed by professionals who prioritize site isolation. While the process involves sanding, etching, and spraying, a reputable technician will seal off the bathroom using 10-ounce canvas drop cloths and heavy plastic draping. By establishing negative pressure ventilation pulling hundreds of cubic feet of air per minute, dust and fumes are safely exhausted outside, leaving your home clean and undisturbed.
How do professionals prep a tub for reglazing?
Professionals prep a tub by first removing old caulking, hardware, and soap scum to create a clean perimeter. The tub surface is then chemically etched and sanded to ensure the new coating bonds perfectly. Simultaneously, the rest of the bathroom is masked off with high-grade tape and 3-mil plastic sheeting to protect adjacent fixtures from any airborne particles.
Is there a lot of overspray with bathtub reglazing?
There should be absolutely zero overspray on your surrounding fixtures. Overspray damage is a sign of rushed or improper preparation. Professional refinishers use a "cleanroom" methodology, completely encapsulating nearby vanities, toilets, and walls with protective barriers before the spray equipment is ever turned on.
Do I need to cover my bathroom vanity when painting a tub?
Yes, your bathroom vanity must be completely covered and sealed. Because spray glazing atomizes the coating into fine particles, even a vanity located several feet away is vulnerable to settling mist. Professionals use low-tack masking tape and heavy-duty plastic to drape the entire vanity, ensuring no residue or droplets reach the cabinetry or sink.
Can reglazing be done without removing the toilet?
Yes, reglazing can typically be completed without removing the toilet, even in tight bathroom layouts common in older 1920s-1950s homes. Technicians use a micro-masking technique to slide protective plastic behind the toilet tank and securely tape the bowl and base. This safely isolates the fixture without risking damage to the porcelain or breaking old plumbing seals.
How long does the protective masking need to stay in place?
The protective masking stays in place only for the duration of the job and the initial stabilizing period of the glaze. Once the coating has flashed off and is no longer tacky enough to catch airborne dust—usually by the end of the appointment—the technician will carefully remove all tape and plastic to leave you with a clean, finished room.
Schedule Service
Thank you! Your submission has been received!
Oops! Something went wrong while submitting the form.
Other Blogs
Customer Testimonials
Hear what customers are saying about our professional refinishing and outstanding results.

Can’t say enough about Maurice. From start to finish great communication his work is incredible and he stands by it very competitive pricing just all-around good guy the work was done quick and kept very clean and our brand new bathroom
Joey N.
We had a large piece of bathtub glaze chip off. Maurice came in and did a fantastic job. It now looks and works better than before. He went above and beyond the contract by cleaning up the old chipped grout between the tub and the tiles and replacing with brand new.
Bozidar J.
Maurice did a great job on my tub. It looks brand new.
Steven S.